
The good people at hobbytronics sell a neat altimeter based on the MPL3115A2 pressure sensor. Its datasheet mentions a one shot mode, which can be a practical solution if one needs a high data acquisition frequency. For some reasons, I did not get the FIFO polling mode to produce new readings at intervals shorter than 512ms. Maybe someone can enlighten me. The main benefit of using the one shot mode is not having to constantly poll the interrupt register to see whether new data has arrived (if you don’t want to connect an additional wire to one of the interrupts pin). As soon as the one shot bit is cleared and reset, a new measurement cycle begins. Its duration is determined by the oversampling bits. The trick is to match loop time with this measurement cycle. For example, if you want to run the loop every 500ms, set oversampling to 128x and you will get roughly one new value every time the registers are read. I clear the one shot bit immediately after reading the register to start a new measurement cycle, so we can do other things while the sensor is busy. The other improvement is reading all registers at once instead of querying them individually, which saves a few bytes of I2C communication.
In general, filtering the data yourself (for example, reading at shorter intervals, but with less oversampling) does not increase precision, but may be more timely depending on the filter you use. Unfortunately, the datasheet does not say how exactly individual readings are combined by the sensor, but it looks like simple averaging (which, of course, is the best linear estimator of the mean).
In case you wonder what the lengthy setup() function does: The aim is to calibrate the altitude readings using the actual sea level pressure, which can only be inferred from a current pressure reading at a known altitude. Hence, you have to provide an altitude (e.g. by hard-coding the altitude or via GPS). The algorithm calculates the sea level pressure using the formula in the datasheet. Theoretically, feeding the sea level pressure back to the sensor, that is, writing to the barometer offset register, should yield an altimeter reading of the known altitude we just used to calculate the pressure. It does not, which implies that the sensor is not (only) using the formula provided in the datasheet. The resulting altitude offset is then saved in a variable to be used when printing the altitude. You could also write this offset to the sensor register to save one addition, but this is less precise (integers only), and you would have to set it back to zero before calculating the sea level pressure at start-up. [The offset was caused by a bug in the pressure calculation code. Thanks to Mike for pointing this out. The altitude setup now works without any offset.]
There also is some background information available from Freescale on how the sensor works in principle and how various offsets can be accounted for.
This is my working example for Arduino:
/*

MPL3115A2 Altitude Sensor One Shot Mode Example
 Henry Lahr, 2013-02-27
 loosely based on: https://github.com/sparkfun/MPL3115A2_Breakout/blob/master/firmware/mpl3115a2/mpl3115a2.ino
 There is no warranty for this code; feel free to use this code for your projects.
 Hardware Connections: VCC = 3.3V; SDA = A4; SCL = A5; INT pins not connected
 Usage:
 - Serial terminal at 115200bps
 - Prints altitude in meters or temperature in degrees C, depending on whether ALTMODE is defined
 */

#include <Wire.h> // for I2C communication

#define ALTMODE; //comment out for barometer mode; default is altitude mode
#define ALTBASIS 18 //start altitude to calculate mean sea level pressure in meters
//this altitude must be known (or provided by GPS etc.)

const int SENSORADDRESS = 0x60; // address specific to the MPL3115A1, value found in datasheet

float altsmooth = 0; //for exponential smoothing
byte IICdata[5] = {0,0,0,0,0}; //buffer for sensor data

void setup(){
  Wire.begin(); // join i2c bus
  Serial.begin(115200); // start serial for output
  Serial.println("Setup");
  if(IIC_Read(0x0C) == 196); //checks whether sensor is readable (who_am_i bit)
  else Serial.println("i2c bad");

  IIC_Write(0x2D,0); //write altitude offset=0 (because calculation below is based on offset=0)
  //calculate sea level pressure by averaging a few readings
  Serial.println("Pressure calibration...");
  float buff[4];
  for (byte i=0;i<4;i++){
    IIC_Write(0x26, 0b00111011); //bit 2 is one shot mode, bits 4-6 are 128x oversampling
    IIC_Write(0x26, 0b00111001); //must clear oversampling (OST) bit, otherwise update will be once per second
    delay(550); //wait for sensor to read pressure (512ms in datasheet)
    IIC_ReadData(); //read sensor data
    buff[i] = Baro_Read(); //read pressure
    Serial.println(buff[i]);
  }
  float currpress=(buff[0]+buff[1]+buff[2]+buff[3])/4; //average over two seconds

  Serial.print("Current pressure: "); Serial.print(currpress); Serial.println(" Pa");
  //calculate pressure at mean sea level based on a given altitude
  float seapress = currpress/pow(1-ALTBASIS*0.0000225577,5.255877);
  Serial.print("Sea level pressure: "); Serial.print(seapress); Serial.println(" Pa");
  Serial.print("Temperature: ");
  Serial.print(IICdata[3]+(float)(IICdata[4]>>4)/16); Serial.println(" C");

  // This configuration option calibrates the sensor according to
  // the sea level pressure for the measurement location (2 Pa per LSB)
  IIC_Write(0x14, (unsigned int)(seapress / 2)>>8);//IIC_Write(0x14, 0xC3); // BAR_IN_MSB (register 0x14):
  IIC_Write(0x15, (unsigned int)(seapress / 2)&0xFF);//IIC_Write(0x15, 0xF3); // BAR_IN_LSB (register 0x15):

  //one reading seems to take 4ms (datasheet p.33);
  //oversampling 32x=130ms interval between readings seems to be best for 10Hz; slightly too slow
  //first bit is altitude mode (vs. barometer mode)

  //Altitude mode
  IIC_Write(0x26, 0b10111011); //bit 2 is one shot mode //0xB9 = 0b10111001
  IIC_Write(0x26, 0b10111001); //must clear oversampling (OST) bit, otherwise update will be once per second
  delay(550); //wait for measurement
  IIC_ReadData(); //
  altsmooth=Alt_Read();
  Serial.print("Altitude now: "); Serial.println(altsmooth);
  Serial.println("Done.");
}

void loop(){
  sensor_read_data();
  // your code here
}

void sensor_read_data(){
  // This function reads the altitude (or barometer) and temperature registers, then prints their values
  // variables for the calculations
  int m_temp;
  float l_temp;
  float altbaro, temperature;

  //One shot mode at 0b10101011 is slightly too fast, but better than wasting sensor cycles that increase precision
  //one reading seems to take 4ms (datasheet p.33);
  //oversampling at 32x=130ms interval between readings seems to be optimal for 10Hz
  #ifdef ALTMODE //Altitude mode
    IIC_Write(0x26, 0b10111011); //bit 2 is one shot mode //0xB9 = 0b10111001
    IIC_Write(0x26, 0b10111001); //must clear oversampling (OST) bit, otherwise update will be once per second
  #else //Barometer mode
    IIC_Write(0x26, 0b00111011); //bit 2 is one shot mode //0xB9 = 0b10111001
    IIC_Write(0x26, 0b00111001); //must clear oversampling (OST) bit, otherwise update will be once per second
  #endif
  delay(100); //read with 10Hz; drop this if calling from an outer loop

  IIC_ReadData(); //reads registers from the sensor
  m_temp = IICdata[3]; //temperature, degrees
  l_temp = (float)(IICdata[4]>>4)/16.0; //temperature, fraction of a degree
  temperature = (float)(m_temp + l_temp);

  #ifdef ALTMODE //converts byte data into float; change function to Alt_Read() or Baro_Read()
    altbaro = Alt_Read();
  #else
    altbaro = Baro_Read();
  #endif

  altsmooth=(altsmooth*3+altbaro)/4; //exponential smoothing to get a smooth time series

  Serial.print(altbaro); // in meters or Pascal
  Serial.print(",");
  Serial.print(altsmooth); // exponentially smoothed
  Serial.print(",");
  Serial.println(temperature); // in degrees C
}

float Baro_Read(){
  //this function takes values from the read buffer and converts them to pressure units
  unsigned long m_altitude = IICdata[0];
  unsigned long c_altitude = IICdata[1];
  float l_altitude = (float)(IICdata[2]>>4)/4; //dividing by 4, since two lowest bits are fractional value
  return((float)(m_altitude<<10 | c_altitude<<2)+l_altitude); //shifting 2 to the left to make room for LSB
}

float Alt_Read(){
  //Reads altitude data (if CTRL_REG1 is set to altitude mode)
  int m_altitude = IICdata[0];
  int c_altitude = IICdata[1];
  float l_altitude = (float)(IICdata[2]>>4)/16;
  return((float)((m_altitude << 8)|c_altitude) + l_altitude);
}

byte IIC_Read(byte regAddr){
  // This function reads one byte over I2C
  Wire.beginTransmission(SENSORADDRESS);
  Wire.write(regAddr); // Address of CTRL_REG1
  Wire.endTransmission(false); // Send data to I2C dev with option for a repeated start. Works in Arduino V1.0.1
  Wire.requestFrom(SENSORADDRESS, 1);
  return Wire.read();
}

void IIC_ReadData(){  //Read Altitude/Barometer and Temperature data (5 bytes)
  //This is faster than reading individual register, as the sensor automatically increments the register address,
  //so we just keep reading...
  byte i=0;
  Wire.beginTransmission(SENSORADDRESS);
  Wire.write(0x01); // Address of CTRL_REG1
  Wire.endTransmission(false);
  Wire.requestFrom(SENSORADDRESS,5); //read 5 bytes: 3 for altitude or pressure, 2 for temperature
  while(Wire.available()) IICdata[i++] = Wire.read();
}

void IIC_Write(byte regAddr, byte value){
  // This function writes one byto over I2C
  Wire.beginTransmission(SENSORADDRESS);
  Wire.write(regAddr);
  Wire.write(value);
  Wire.endTransmission(true);
}
Update (2013-06-26):
I have not tested the sensor’s stability and precision. However, I did use it in combination with an accelerometer to obtain vertical position and velocity. Because obtaining altitude and velocity involves trading off precision in altitude against precision in velocity, the graph below can only give an indication of the sensor’s precision. I am quite happy with the performance so far. This graph shows a ride in the lift from 20m down to about 5m (never mind the arbitrary altitude offset):
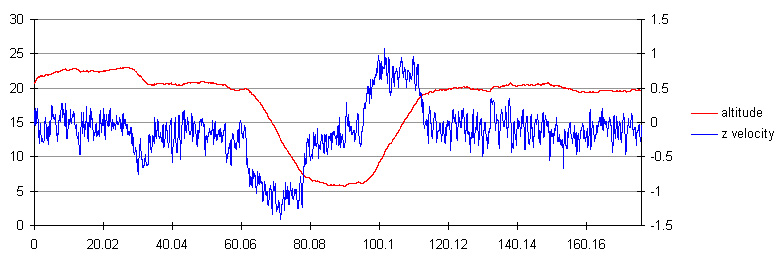
Time on the x-axis is in seconds. Altitude in meters is the red line with the scale on the left. The blue line is vertical velocity in m/s, measured on the right hand scale. Both values are calculated from acceleration and altitude in two loops, based on estimated average loop time of 22ms:
Altitude: zpos=0.95*(zpos + zvel*G_Dt + netacc/2 * G_Dt*G_Dt) + 0.05*curralt,
Velocity: zvel=0.95*(zvel+ netacc*G_Dt) + 0.05*(curralt-altold)/(5*G_Dt),
where netacc is vertical acceleration, G_Dt is about 22ms, curralt is the altimeter reading and altold is the previous altimeter reading. The factor of 5 accounts for the different update rate in accelerometer (once per loop) and altimeter (once every 5 loops) readings.
12 comments
Skip to comment form
Hi,
I don’t understand one part of your code. According to the datasheet the pressure data is stored in 3 bytes and 18 bits make up the integer part and 2 bits make up the fractional part.
In your code you take the MSB and bit shift it left 10 places and then the CSB you bit shift it left 4 places, meaning 1 bit overlaps. Also in the LSB bits 7 and 6 according to the datasheet make up the 17th and 18th bit of the integer part of the pressure reading. So surely you would need to add these two bits to the calculation? You seem to discard them.
Finally, it is bits 5 and 4 that make up the fractional part of the pressure reading and yet you bit shift the LSB to the right 6 places meaning you are using bits 7 and 6 as the fractional part and not bits 5 and 4.
I am confused as your code seems to differ from what the datasheet says the pressure reading is stored as.
I would appreciate if you could clarify. Thanks.
Mike
Author
Hi Mike,
Thanks for pointing this out. The correct pressure calculation should be: Obtain the fractional part from shifting the LSB 4 bits to the right and dividing by 4 (this combines the two smallest integer bits and the fractional part). Shift the MSB by 10 bits to the left (this was correct) and the CSB by 2 (this was not), cast into float and add the fractional part. Correcting this error also solved the mysterious altitude offset problem, and the setup code got a little shorter.
Henry
Henry.
Looking at your code example, it seems that you are still missing a few bits to obtain the correct pressure value. As Mike has pointed, you need to add the two left-most bits (7-6) from the LSB to the integer part.
Alt
Author
Alt,
The trick is to use bits 7-6 and the fractional bits 5-4 at the same time. Note that the LSB is shifted four places to the right and not six, which would put bits 7-6 in the right place. Dividing the result by four yields the correctly scaled bits 7-6 and also takes care of the fractional bits 5-4.
Oh, yes! Nice one!
Hi,
Do you finalise some test with MPL3115A2 ?
What about the stability of the pressure measurement ?
Did you try to check 1 meter difference altitude several time ? What about the result ?
Thank a lot in advance for yours answers
Jack
Author
Hi Jack,
I did not test the sensor’s precision on its own, because I needed a solution that gives me a vertical velocity as well. I added some data on this combined accelerometer + altimeter setup to the post. Maybe this helps. You can see on the right hand side of the graph that altitude readings are quite stable if the sensor is stationary. If I move it around a bit, the altitude drifts due to the accelerometer component in my filters. The magnitude of this drift is a function of the filter parameters and can be as low as about 0.3m. This value is claimed by the datasheet and looks about right.
Best,
Henry
Hi,
I am having an issue where I am trying to move this program from a Arduino Uno to a Arduino Pro Mini. The issue is that there are only A0-A3 analog pins. Nowhere in the code can I find a way to change the hardware connections from A4 & A5 to my avaliable pins. Does someone know how I can fix this? I assume it’s something to do with the memory hex values, but I don’t know how to lookup/understand those values.
Thanks,
C
Author
Hi Clauber,
This code actually runs on an Arduino Pro Mini. As far as the code is concerned, the Arduino Uno and Pro Mini are identical. The hardware difference is that you can find the A4 and A5 pins not on the edge of the board, but in the middle right next to the Atmega chip. Sometimes, even the A6 and A7 pins are brought out.
Hope this helps.
Henry
Hi Henry,
I too built this sensor with a pro mini Arduino set up and plan to add an accelerometer for gravity and motion logging. Do you know how to use the FIFO capability of the Altimeter to get time vs. output (pressure, altitude, temperature, etc.) data over an arbitrary (limited by the sampling rate and device memory) time interval? I’d like to download the data held in the Altimeter’s FIFO buffers into an onboard SD card or laptop excel spreadsheet. Have you done something like this before or know someone who has? Thanks,
Kris
Author
Hi Kris,
My goal for this project was to maximise sampling rate while keeping noise low in a real-time environment. I have not used the FIFO capability, which I assume would be useful if you wanted to reduce power consumption or processing overhead. The only application I can image for which FIFO would be useful is when you want to outsource timekeeping to the sensor or to let the Arduino sleep between measurements. If keeping a precise measurement interval is not critical, I would use the one-shot mode and let the Arduino sort out the timing and polling. I did not find any information which filtering algorithms are used by the chip, but this is probably only relevant if you want to maximise the time resolution and consider doing the filtering in your own code. From a measurement error point of view it seems reasonable to use the altimeter’s full time resolution, that is, running a loop close to the minimum time between samples for a given oversampling mode (page 33 on the datasheet).
Cheers,
Henry
Busy with a water rocket hobby project; I want the arduino to log the altitude.
And yes… it works first time right; the arduino feather ‘adalogger’ can do the job!
Excellent thanks a lot.